ShopDreamUp AI ArtDreamUp
Deviation Actions

Fascinating World of Mold-Making and Casting
Have you ever wondered how sculptors and modelers make a limited production of their work? It is an involved process that can be simplified into the following major steps:
1. Create the original sculpture.
2. Make a mold of the original sculpture.
3. Cast parts using the mold.
4. Clean up and assemble the parts.
5. (Optional) Prepare for painting, and paint.
********
'The Master'
No, I am not talking about one who dishes out instructions , rather, the original sculpture that the sculptor/modeler makes. As an example, the deviation below is an original sculpture of Urd, Goddess of the Past in the Ah! My Goddess manga. This example will be used to illustrate the process of making mold and casting.
 The different colors of epoxy clay are used to enhance visualization.
If the sculptor/modeler intends to make duplicates of the master, then the master must be sculpted to be molding- and casting-friendly. This means that, in many cases, the master must be sculpted in parts so that it can be easily cast. In this example, the Urd in Kimono figure was intended to be made into a kit, so it is sculpted accordingly.
 This figure is consisted of 15 parts.
INTRODUCTION TO MOLD-MAKING
There are many mold-making materials, and many methods for using them. Information on selecting and using appropriate materials for your application is generally provided on the manufacturers/retailers’ websites. For small figures, the most commonly used mold material is silicone mold. The two most common mold types are block mold and two-part mold. The basic steps of making these two common types of mold are illustrated here.
Making Block Mold
The first task in making the mold is to create the mold box, so that it will minimize the amount of silicone needed to create the mold (silicone is expensive, ranging from $70 to $200 per gallon).
 The tubing of hair gel is creatively used as the 'mold box' for the block mold of Urd's head.
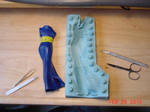
 For Urd's hair ponytail and sleeves, I chose to go with block mold, and custom-made mold box for each.
The mold box should be made so that there is a minimum of 1/4-inch of space around the part’s extremities, thicker (to 1/2-inch) if the part is relatively large. Foam board is excellent for use in making mold boxes. You may notice the light-gray putty on the parts. This is sulfur-free oil clay, called plasticine, generally used for sculpting, that never dries. I use Klean Klay in this application to make 'temporary' parts. The plasticine is used to make the shapes of pour spout for pouring liquid resin. To eliminate bubbles during casting, I connect hair tips with thin plastic strips so that liquid resin will flow through the hair tips. This gate-designing activity is very important in mold-making, as you must visualize how resin would and should flow through the mold, and then add connecting bridges/vents to the part in order to avoid trapped air pockets (which will cause casting defects).
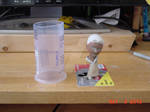
 To make quality mold, the silicone should be de-gassed.
The de-gassing equipment is called a vacuum chamber. It consists of a compressor capable of pulling air out of the tank to create a state of near vacuum (up to -29.9-inch of mercury). If you look closely, the silicone is actually foaming up in big bubbles. This is because vacuum causes the trapped bubbles to expand and rise to the surface and pop. In general, you will need a container that will allow silicone to expand up to 5X the original volume to avoid spill-over during the de-gassing process. Occasionally, you may need to slightly release the vacuum to collapse the foaming bubbles. Also, when de-gassing is done, release vacuum slowly, otherwise sudden in-rush of air will cause silicone to splatter everywhere!
(Tip: it is possible to make quality mold without using a vacuum chamber: first pour a thin layer of silicone on the part and use a brush to brush surfaces so that all surfaces are coated. Pop any bubbles on this thin layer as necessary. Then, pour the rest of silicone in a corner away from the part and let it level up. This way, bubbles that are still trapped in the silicone are likely to be not near the part's surface.)
Trapped bubbles in the silicone mold will cause 'warts' and dimples on the cast parts. This is because, during the resin curing process, tremendous heat is generated while the resin cures, causing the bubbles in silicone mold to expand and warp the surfaces of the cast part. Also, if the mold is to be used in pressure casting (more about this process later), then it must be bubble-free, because pressure will deform a mold with excessive trapped bubbles.
Before pouring, spray and brush on release agent (containing no silicone) on the part to make the subsequent part extraction easier.
 Even after silicone is completely de-gassed, some bubbles may still form during the pouring step.
 An unfolded paper clip is used to pop surface bubbles.
Note that there are Klean Klay around lower corners of the mold box to seal off any holes - other wise, silicone may leak and make a mess.
Fortunately these bubbles tend to stay close to the liquid surface and generally rise without additional de-gassing. However, another de-gassing may be required to pull these bubbles to surface. Because mixing silicone and de-gassing generally takes several minutes (up to 20 minutes for me), it is important to select a silicone cure time that will accommodate your work time. Generally, a gel-time of 45+ minutes is sufficient for most pours.
 This is what a block mold looks like once cured.
Curing can take several hours to a day, depending on the specific silicone. I use translucent silicone to make block mold because it allows me to see the part as I make the cut to extract the master inside.
The next step - the cut - is quite critical as it will make or break the mold. The cut is need to extract the master and to make the mold close exactly the same way every time so that the seamline on the cast part is minimized. For me, it works to make two cuts. The first cut is an "S" cut, designed to interlock the cut surfaces. The second cut is a relatively straight cut that cuts to the surface of the master. With the two-cut method, the cut seam is consistently interlocked in all directions.
After the cut, the inside cavity of the mold is sprayed with release agent, then closed back up. For smallish molds, rubber bands are used to keep the cut seam tight; for larger molds, cardboard may be required to keep the sidewall of the mold from deforming.
Pressure Casting
A common casting medium is two-part polyurethane resin. It is versatile and easy to use, but has one major drawback of generating micro bubbles during the curing process. Micro bubbles will form when polyurethane resin is exposed to humidity in the air. Micro bubbles on or near cured surface of the part become pinholes and are tedious to patch and fix, making the preparation of each cast part quite laborious. The most proven way to get rid of the micro bubbles is to crush them during the curing process, and that can be done under pressure - thus the preferred method of pressure casting over ambient casting. Pressure casting requires vigilant safety practices, as pressurized equipment can be very dangerous if improperly used. (Tip: To minimize formation of micro-bubbles without pressure casting, i.e., to do ambient casting, choose a resin system that has fast-curing time – basically to have parts cure before tiny bubbles have a chance to make it to the parts surface.)
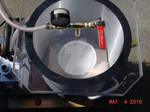
 I used an industrial-grade pressure paint pot and converted it into the pressure tank for casting use.
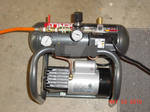 A portable air compressor is used to supply and regulate pressurized air.
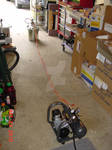 Setup for pressure-casting.
I have a very healthy respect for pressurized systems, particularly ones that requires frequent and repeated opening and sealing, in this case, the pressure tank. The pressure tank (in the upper part of picture) is located about ten feet away from the air compressor (in the lower part of picture), so that if it explodes, the operator (me) is not standing next to it.
 Cured parts in silicone molds inside the pressure tank. After the prescribed curing time, the pressure is released from the tank. The parts are cured in the silicone molds.
 Voila! A copy of the master is cast in resin.
Two-Part Mold
Although block mold will produce cast with minimal seamlines, it is not always practical, particularly if the part has complicated geometries. Additionally, a block mold tend to tear easier than a two-part mold during the part-extraction process. Urd’s kimono is good example for using a two-part mold.
 In making a two-part mold, the first step is to clay-up half of the part, using Klean Klay, with the location of seamlines carefully selected.
 The clayed-up part is placed in a custom mold box. The clay surfaces are smoothed and pushed against the interior of mold box, such that there are no gaps for silicone to leak through. Then, keying holes are pushed into the clay, as well as, a pouring spout is being made from Klean Klay and added to the top of the part.
 Once the clay-up is done, spray non-silicone release agent on the surfaces, and pour silicone as previously described. Once the silicone is cures, the Klean-Klay is dug out, and the part and the first half-mold are washed using a brush, soap and hot water. Flash is cut using X-acto knife, or trimmed off using precision scissor, such as manicure scissor. Then, the part and the first half mold are dried, re-assembled, and put back in mold box (now with the bottom removed so that the once bottom side becomes the top). Now the most important part - spray non-silicone release agent on the surfaces so that the second half mold will not become glued to the first half. Pour second half mold like the first half.
 The first cast shows significant flash (the white thin membrane all around the cast part). This indicates that, for the next cast, more pressure is needed to hold the two halves of the mold together.
Kit Is Made
With the mold-making and casting done for all parts, a complete kit can then be assembled and put together as illustrated.
 Urd in Kimono in kit form and assembled form.
Parts in a kit form generally require substantial preparation work before painting and finishing can be done. For more information on turning a kit into beautiful figure, please see this article: Fascinating World of Anime Figure Modeling
********
Have you ever wondered how sculptors and modelers make a limited production of their work? It is an involved process that can be simplified into the following major steps:
1. Create the original sculpture.
2. Make a mold of the original sculpture.
3. Cast parts using the mold.
4. Clean up and assemble the parts.
5. (Optional) Prepare for painting, and paint.
********
'The Master'
No, I am not talking about one who dishes out instructions
The different colors of epoxy clay are used to enhance visualization.If the sculptor/modeler intends to make duplicates of the master, then the master must be sculpted to be molding- and casting-friendly. This means that, in many cases, the master must be sculpted in parts so that it can be easily cast. In this example, the Urd in Kimono figure was intended to be made into a kit, so it is sculpted accordingly.
This figure is consisted of 15 parts.INTRODUCTION TO MOLD-MAKING
There are many mold-making materials, and many methods for using them. Information on selecting and using appropriate materials for your application is generally provided on the manufacturers/retailers’ websites. For small figures, the most commonly used mold material is silicone mold. The two most common mold types are block mold and two-part mold. The basic steps of making these two common types of mold are illustrated here.
Making Block Mold
The first task in making the mold is to create the mold box, so that it will minimize the amount of silicone needed to create the mold (silicone is expensive, ranging from $70 to $200 per gallon).
The tubing of hair gel is creatively used as the 'mold box' for the block mold of Urd's head. For Urd's hair ponytail and sleeves, I chose to go with block mold, and custom-made mold box for each.The mold box should be made so that there is a minimum of 1/4-inch of space around the part’s extremities, thicker (to 1/2-inch) if the part is relatively large. Foam board is excellent for use in making mold boxes. You may notice the light-gray putty on the parts. This is sulfur-free oil clay, called plasticine, generally used for sculpting, that never dries. I use Klean Klay in this application to make 'temporary' parts. The plasticine is used to make the shapes of pour spout for pouring liquid resin. To eliminate bubbles during casting, I connect hair tips with thin plastic strips so that liquid resin will flow through the hair tips. This gate-designing activity is very important in mold-making, as you must visualize how resin would and should flow through the mold, and then add connecting bridges/vents to the part in order to avoid trapped air pockets (which will cause casting defects).
To make quality mold, the silicone should be de-gassed.The de-gassing equipment is called a vacuum chamber. It consists of a compressor capable of pulling air out of the tank to create a state of near vacuum (up to -29.9-inch of mercury). If you look closely, the silicone is actually foaming up in big bubbles. This is because vacuum causes the trapped bubbles to expand and rise to the surface and pop. In general, you will need a container that will allow silicone to expand up to 5X the original volume to avoid spill-over during the de-gassing process. Occasionally, you may need to slightly release the vacuum to collapse the foaming bubbles. Also, when de-gassing is done, release vacuum slowly, otherwise sudden in-rush of air will cause silicone to splatter everywhere!
(Tip: it is possible to make quality mold without using a vacuum chamber: first pour a thin layer of silicone on the part and use a brush to brush surfaces so that all surfaces are coated. Pop any bubbles on this thin layer as necessary. Then, pour the rest of silicone in a corner away from the part and let it level up. This way, bubbles that are still trapped in the silicone are likely to be not near the part's surface.)
Trapped bubbles in the silicone mold will cause 'warts' and dimples on the cast parts. This is because, during the resin curing process, tremendous heat is generated while the resin cures, causing the bubbles in silicone mold to expand and warp the surfaces of the cast part. Also, if the mold is to be used in pressure casting (more about this process later), then it must be bubble-free, because pressure will deform a mold with excessive trapped bubbles.
Before pouring, spray and brush on release agent (containing no silicone) on the part to make the subsequent part extraction easier.
Even after silicone is completely de-gassed, some bubbles may still form during the pouring step. An unfolded paper clip is used to pop surface bubbles.Note that there are Klean Klay around lower corners of the mold box to seal off any holes - other wise, silicone may leak and make a mess.
Fortunately these bubbles tend to stay close to the liquid surface and generally rise without additional de-gassing. However, another de-gassing may be required to pull these bubbles to surface. Because mixing silicone and de-gassing generally takes several minutes (up to 20 minutes for me), it is important to select a silicone cure time that will accommodate your work time. Generally, a gel-time of 45+ minutes is sufficient for most pours.
This is what a block mold looks like once cured.Curing can take several hours to a day, depending on the specific silicone. I use translucent silicone to make block mold because it allows me to see the part as I make the cut to extract the master inside.
The next step - the cut - is quite critical as it will make or break the mold. The cut is need to extract the master and to make the mold close exactly the same way every time so that the seamline on the cast part is minimized. For me, it works to make two cuts. The first cut is an "S" cut, designed to interlock the cut surfaces. The second cut is a relatively straight cut that cuts to the surface of the master. With the two-cut method, the cut seam is consistently interlocked in all directions.
After the cut, the inside cavity of the mold is sprayed with release agent, then closed back up. For smallish molds, rubber bands are used to keep the cut seam tight; for larger molds, cardboard may be required to keep the sidewall of the mold from deforming.
Pressure Casting
A common casting medium is two-part polyurethane resin. It is versatile and easy to use, but has one major drawback of generating micro bubbles during the curing process. Micro bubbles will form when polyurethane resin is exposed to humidity in the air. Micro bubbles on or near cured surface of the part become pinholes and are tedious to patch and fix, making the preparation of each cast part quite laborious. The most proven way to get rid of the micro bubbles is to crush them during the curing process, and that can be done under pressure - thus the preferred method of pressure casting over ambient casting. Pressure casting requires vigilant safety practices, as pressurized equipment can be very dangerous if improperly used. (Tip: To minimize formation of micro-bubbles without pressure casting, i.e., to do ambient casting, choose a resin system that has fast-curing time – basically to have parts cure before tiny bubbles have a chance to make it to the parts surface.)
I used an industrial-grade pressure paint pot and converted it into the pressure tank for casting use. A portable air compressor is used to supply and regulate pressurized air. Setup for pressure-casting.I have a very healthy respect for pressurized systems, particularly ones that requires frequent and repeated opening and sealing, in this case, the pressure tank. The pressure tank (in the upper part of picture) is located about ten feet away from the air compressor (in the lower part of picture), so that if it explodes, the operator (me) is not standing next to it.
Cured parts in silicone molds inside the pressure tank. After the prescribed curing time, the pressure is released from the tank. The parts are cured in the silicone molds. Voila! A copy of the master is cast in resin.Two-Part Mold
Although block mold will produce cast with minimal seamlines, it is not always practical, particularly if the part has complicated geometries. Additionally, a block mold tend to tear easier than a two-part mold during the part-extraction process. Urd’s kimono is good example for using a two-part mold.
In making a two-part mold, the first step is to clay-up half of the part, using Klean Klay, with the location of seamlines carefully selected. The clayed-up part is placed in a custom mold box. The clay surfaces are smoothed and pushed against the interior of mold box, such that there are no gaps for silicone to leak through. Then, keying holes are pushed into the clay, as well as, a pouring spout is being made from Klean Klay and added to the top of the part. Once the clay-up is done, spray non-silicone release agent on the surfaces, and pour silicone as previously described. Once the silicone is cures, the Klean-Klay is dug out, and the part and the first half-mold are washed using a brush, soap and hot water. Flash is cut using X-acto knife, or trimmed off using precision scissor, such as manicure scissor. Then, the part and the first half mold are dried, re-assembled, and put back in mold box (now with the bottom removed so that the once bottom side becomes the top). Now the most important part - spray non-silicone release agent on the surfaces so that the second half mold will not become glued to the first half. Pour second half mold like the first half. The first cast shows significant flash (the white thin membrane all around the cast part). This indicates that, for the next cast, more pressure is needed to hold the two halves of the mold together.Kit Is Made
With the mold-making and casting done for all parts, a complete kit can then be assembled and put together as illustrated.
Urd in Kimono in kit form and assembled form.Parts in a kit form generally require substantial preparation work before painting and finishing can be done. For more information on turning a kit into beautiful figure, please see this article: Fascinating World of Anime Figure Modeling
********

Devious Journal Entry
On today, I have become a son without his mother.
A Hug, If You Would
Hi Friends and Watchers,
A hug, if you would, and I would appreciate it.
For over a year, I enjoyed the joys of having a best-best friend. But am now abandoned by the person. Though details matter not, hurtful feelings do. And they cut me and make me feel alone when I am not alone.
In five days, I am supposed to host an art party. Now, I've got to pick myself back up from feeling hurt, so I don't mess up my art event. There's never a good time to be betrayed by your best friend, is there?
So, with some hugs, I'd imagine I could start the healing process.
~Arty :|
[2/25/2013 9:13PM UPDATE]
I am overwhelmed by all the supportive hugs and
New Residence, New Beginning
Hi Everyone! :D
The Move
It's been quite a while, but I'm alive and well. :) The move across country was exhausting and somewhat traumatic, particularly the preparations for the move and the packing/loading/moving days. The move was done by professional packers and movers, and we were just shocked at how much junk we have accumulated over the years - our stuff filled up about 2/3 of the 40' tractor-trailer! :wow: Of course, I had to pack all of my figures and sculpting stuff because I wouldn't expect anybody else to know how to disassemble my sculptures and figures and properly pack them.
Anyway, after the driver took off with most of our
Beginning of the End of My CA Era
So my California era has begun to come to an end.
Bittersweet, it truly is.
Most unfortunate that the economy tanked as I cheerfully pursued my CA dreams.
Most unhappy that my career will need to be rebuilt.
Most fortunate that I have met my best friend during the time here.
Most happy that my children are well and growing most beautifully.
Sculpting was started here, and seems to be ending here, as well. Not that this is much different than the usual, but commission is no longer being considered, except for those potentially from family and close friends. I have one outstanding obligation, which is to finish painting Hellobaby (https://www.deviantart.com/hellobaby)'s D
© 2010 - 2024 ArtyAMG
Comments33
Join the community to add your comment. Already a deviant? Log In
Awesome article!
I hope this will help some to understand what casting means. (and draws them into the hobby. >D)
I hope this will help some to understand what casting means. (and draws them into the hobby. >D)